Note in 2025:
This content was retrieved from my old blog via The Wayback Machine (archive.org). Unfortunately, archive.org did not store some of the pictures, and any of the ZIP files.
A bunch of graphics demos that I created during the first half of the nineties, along with quite a bit of rambling about the techniques that I used, my thoughts on how things have changed since then, references to the original games which influenced the creation of the demos, etc.
Introduction
These are a bunch of little applications that I created back in the dark ages of computing, when filenames were eight plus three in caps, screens were 80 by 25 in text, game graphics were 320 by 200 in 256 colors at best, the Internet barely existed, the memory was divided in 16-byte segments, and even the slightest program crash meant that you had to reboot your computer. I am talking about the first half of the nineties.
Being more than ten years old, these demos certainly qualify as vintage stuff by software aging standards. Each one of them is a programming testbed, or a proof of concept at best, and not really a demo that you can fire up and sit back and relax watching as the demos of the famous demo scene are. None of them is anything great compared to the awesome graphics that we are used to today, but back then each one of them did represent a feat, and a bunch of them together in a floppy disk along with my Résumé did in fact result in job interviews with Southern Californian gaming companies such as Activision, Blizzard, and CyberDreams. CyberDreams did actually extend a job offer to me, but I did not accept it because I wanted more money. These demos were all written in Borland C++ 3.5 and Borland Turbo Assembler. (I used to be a big Borland fan back then, when it made sense.) The target architecture was 80386 16-bit real mode, and the target operating system was MS-DOS.
The demos
ARK
 ]
]
The ARK demo shows the basic technique of back-buffered sprites. It was created with the aspiration to one day become a 3D Arkanoid game. You are looking at a room, there is a red ball bouncing off the walls making some oh-so-eighties sounds from the PC speaker, and there is a racquet which you control with the mouse. That's all. The ball always bounces off the screen, there no check to determine whether it hit the racquet or not.
This demo is so simplistic that it does not even utilize pixmap scaling. As the ball moves close to or away from the viewer, the different ball size is achieved by selecting a larger or smaller sprite to display. The only cool feature in this demo is the minimal front-buffer update, which basically means that instead of copying the entire back-buffer into the video RAM on every frame, it keeps track of and updates only those rectangular portions that have changed since the last frame.
| Available controls: | |
|---|---|
| SPACE | Begin the demo |
| Mouse | Move the racquet around |
| ESC | Terminate the demo |
SCROLL
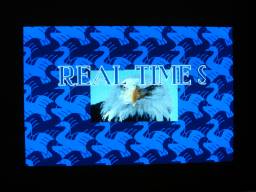
Two things that the ARK demo was obviously missing was text display and pixmap scaling. When I developed these routines a short time thereafter, I created this little demo to show them off. SCROLL.EXE just displays an image of an eagle which zooms in and out of the center of the screen, while a scrolling marquee of text zips across the screen. The pixmap scaling routine contained in this demo represents my very first endeavors with the concept of interpolation, as well as one of my first attempts at live code generation: when you call this routine to scale a pixmap from a certain size to another size, it generates a piece of 80386 machine code which will scale one raster line from the source image into the destination image as efficiently as possible, and then it invokes this code while interpolating over raster lines.
The text rendering routine also makes use of live code generation: instead of having a single character drawing routine which reads information from some font data structure and writes it to the video buffer, there is one character drawing routine per character in the font. Each one of these character drawing routines consists of a series of machine instructions that directly store the pixels that make up the character at the raster lines pointed by the DI register. This is about as fast as it gets.
These live-code-generation and loop unwinding techniques are good reminders of how different the coding paradigm was back then: the hardware and the firmware did practically nothing for you, so you had to do everything by yourself, and the CPUs were so wimpy that many times you had to work hard and come up with miracles in order to achieve the best possible performance.
Back then unwinding a tight loop into a long sequence of code was considered a good idea, because the decrement-and-jump instruction took up a non-negligible number of clock cycles, as well as the precious CX register. Besides, the prefetch queue of the 386 was only long enough for a couple of instructions, meaning that no matter how small your loop was, it would never enjoy the privilege of being fully cached in the CPU anyway, so short code offered no advantage over long code as far as caching was concerned. Mind you, it would take a couple of more years before the Microsoft Visual C++ Compiler would start offering "function inlining" and "loop unwinding" optimizations.
Today these tricks have either fallen out of grace, or are inapplicable to begin with. Inapplicable, because the hardware and the firmware nowadays handle all the low level stuff, and even when they do not, we have so much CPU power that we never really need to bother with assembly language tricks anymore. Out of grace, because tight code is preferred nowadays over long code in order to best utilize the caching that modern hardware architectures are invariably equipped with, and also because modern CPUs will generally execute the loop-counter-decrement-and-jump instruction in parallel with other instructions in their pipeline, possibly predicting its outcome, and completely invalidating our intuitive notion of what is efficient and what is not, by yielding a total execution time of nearly zero clock cycles for that instruction.
I used to program in Assembly language with the reference book next to me, not because I needed to look up the instructions, (of course I knew them all by heart,) but because I had to always look up the number of clock cycles that each individual instruction and each individual addressing mode would require, so as to always be sure that for any given block of code I had chosen the most optimal sequence of instructions. I look back at those times now, and I think to myself "what a waste of time!".
| Available controls: | |
|---|---|
| Any key | Terminates the demo |
BMPROT
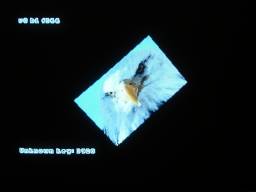
BMPROT demonstrates the use of a routine written in 80386 Assembly which copies a convex polygonal area from one pixmap to another, applying rotation and scaling on the way. Its creation was inspired by just one simple little thing: the nicely rotated images of galaxies that were decorating the background of spaceship dogfights and serving as points of reference in Wing Commander by Origin. When you run the demo you see the image of an eagle rotating around the center of the screen. You can use the plus and minus keys on the numeric keypad to increase or decrease the scale factor of the rotating picture. I think that the visual result achieved by my routine is better than that of Origin, but then again I suppose that is only because Origin choose to take shortcuts in order to save clock cycles.
On the top-left corner of the screen you can see the number of frames per second, along with the current settings for vertical flyback and buffering. You can try hitting 'V' to disable vsync and see the rotation go ballistic.
You might notice that the image is kind of jerky as it rotates, and this is especially visible at high zoom levels, when the image is covering the entire screen. This is partly due to the complex scheme employed for achieving proper clipping for the transformed polygon both in the source and in the destination pixmap, and partly due to reasons that... are currently unknown and under research. (Hey, nobody's perfect.)
| Available controls: | |
|---|---|
| V | Toggle waiting for vertical flyback |
| B | Toggle clearing the backbuffer |
| Numeric Keypad Plus ('+') | Enlarge the rotating bitmap |
| Numeric Keypad Minus ('-') | Shrink the rotating bitmap |
| ESC | Terminate the demo |
VECTOR
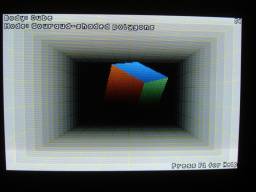
This is a vector graphics demo which displays three-dimensional solid objects rotating, moving around, and bouncing against the walls of a room, using a few different drawing modes.
The original version of this demo had just two drawing modes: Wireframe and Solid Polygons, while Gouraud Shading was added later. It was inspired by X-Wing by Lucas Arts and MechWarrior II by Activision, which made use of vector graphics, as opposed to the bit-mapped graphics of games such as Wing Commander by Origin, which had been pretty standard until those days.
Unfortunately, as I was working on graphics alone on my spare time, I was constantly re-inventing wheels because I did not have the necessary resources to learn the theory behind things, I had no guidance, no previous work to build on, and also because I was arrogant enough to believe that I could figure out everything by myself in less time than it would take me to find the relevant literature and read it. So, I was still trying to figure out how on earth X-Wing and MechWarrior managed to create their marvelous sensation of realism, (it seemed to have something to do with the way they illuminated the polygons that made up the objects, but back then I did not even know it was called Flat Shading,) when Lucas Arts released that awesome sequel to X-Wing called TIE Fighter, and I still remember how my jaw dropped when I first saw TIE Fighter's much more complex form of polygon shading. Luckily, in the options screen of TIE Fighter I discovered that this technique had a name, and the name actually sounded like something researchable: "Gouraud Shading". That was when I finally realized that I was going nowhere by trying to figure things out by myself, and I went straight to the library to learn who that Gouraud guy was and exactly what he had become famous for. A few sleepless days later, the "Gouraud Shaded Polygons" drawing mode was added to the demo.
The major challenge here was that on a 256-color palette you cannot just interpolate from one intensity value to another and expect the result to look good, because the palette generally contains few colors between any desired pair of intensity values, so a hideous banding phenomenon occurs. In order to avoid banding, it is necessary to add some kind of progressive noise. The prospect of coming up with an algorithm which performs real-time dithering on every single face of a 3-D animated solid object sounded like plain impossible, but luckily TIE Fighter stood as proof that it could be done. I did not consult any books for that one, because I knew that the solution would have to be very dirty in order to be feasible. My dithering algorithm (or should I say hoax) loads a pseudorandom bit pattern in a 32-bit register, and every time it needs to render a pixel it performs one circular rotation on that register, which leaves a pseudorandom bit in the carry flag. Then, an "add zero with carry" operation is performed on the accumulator, (which already contains the color index of the pixel to render,) and this has the effect of pseudorandomly incrementing or omitting to increment the color index, essentially adding noise. The algorithm makes use of 16 different 32-bit pseudorandom bit patterns ranging from almost all bits cleared to almost all bits set, and at any given time it selects one of the patterns depending on the desired intensity, so a total of 16 X 16 = 256 different shades of noise are possible out of only 16 different palette entries.
Please note that the mathematics in this demo are not sound, and so the shading does not look as cool as it would with proper math. When I wrote the Gouraud Shader I wanted to see the results on my screen ASAP, without having to mess with --what appeared to me back then as-- hairy trigonometry, so what I did in this demo is that I emulated a light source directly above the object (at 12 o'clock) by calculating the intensity value of each vertex based on nothing but its Y coordinate (its distance from the light source) instead of properly calculating the relative angle between the light source and the normal to the surface. Not correct, but good enough to show the beauty of Gouraud Shading with progressive noise.
Automatic object movement, rotation, and selection are all enabled by default for the purpose of the demo, but you can disable them if you want to take control of the objects by hitting Alt+M, Alt+S, Alt+R, and Alt+D. You can hit F1 to see the help screen which explains some of the keys, but the easiest thing to do is to print the "available controls" section at the end of this article.
The number of frames per second is displayed on the top-right corner of the screen. Since waiting for vertical flyback is enabled by default, this number should reflect the refresh rate that the VGA virtualization module of your Virtual DOS Machine wants my demo to see, which is usually around 65, regardless of what your video card feeds your monitor with. If you disable waiting for vertical flyback by hitting Alt+V, the number of frames per second should skyrocket. (It reads 300 on my 1.7 GHz P4.) Unfortunately, the code which handles the movement of objects in space is a simplistic quantum-of-spatial-advancement-per-frame type of thing, (instead of a proper velocity vector approach,) so as the number of frames per second increases, the movement of the objects becomes frantic. I know that this not the right way to do things, but for the purposes of this demo it works just fine.
VECTOR.EXE was made out of a multitude of .CPP and .ASM files from my graphics library, and one and only one application-specific file. This file, VECTOR.CPP, is included with the demo as sample source code. Please note that this code has not been written to impress; this is how I used to write code for myself ten years ago. Also please note that this code was NOT made having performance as an absolute priority; when writing it I was more interested in proving the concepts that I had in my mind, rather than proving that I can write fast and dirty spaghetti code.
VECTOR.EXE obtains the descriptions of the objects that it renders from a text file called VECTOR.BDL, which contains statements of a home-brewed 'Body Definition Language', which is read using a simple hard-case parser. (XML had not been invented yet back then.) The invisible surface elimination algorithm is very simple: all faces are required to be specified in BDL in a clockwise fashion, so, if after projection a face is still clockwise, then it is visible; if it has become counter-clockwise, it is facing away from the viewer, so it is invisible.
| Available controls: | |
|---|---|
| F1 | Display the help screen |
| Alt+M | Toggle automatic object movement |
| Alt+S | Toggle automatic object selection |
| Alt+R | Toggle automatic object rotation |
| Alt+D | Toggle automatic drawing mode selection |
| Alt+V | Toggle waiting for vertical flyback |
| Numeric Keypad Up Arrow | Move the object up |
| Numeric Keypad Down Arrow | Move the object down |
| Numeric Keypad Left Arrow | Move the object to the left |
| Numeric Keypad Right Arrow | Move the object to the right |
| Numeric Keypad '+' | Move the object closer |
| Numeric Keypad '-' | Move the object away |
| Numeric Keypad '5' | Re-center the object, bring it close to the camera, and undo any rotation. |
| Cursor Keypad Up Arrow | Rotate the object clockwise about the X axis |
| Cursor Keypad Down Arrow | Rotate the object counter-clockwise about the X axis |
| Cursor Keypad Left Arrow | Rotate the object clockwise about the Y axis |
| Cursor Keypad Right Arrow | Rotate the object counter-clockwise about the Y axis |
| '<' | Rotate the object clockwise about the Z axis |
| '>' | Rotate the object counter-clockwise about the Z axis |
| A | Display the cube |
| B | Display the checkered sphere |
| C | Display the pyramid |
| D | Display the cone |
| E | Display the cylinder |
| F | Display the dodecahedron |
| G | Display the decatetrahedron |
| H | Display the crystal with the pentagonal corss-section |
| I | Display the crystal with the octagonal cross-section |
| J | Display the plain Sphere |
| K | Display the "Weird #1" object |
| L | Display the "Weird #2" object |
| M | Display the "Weird #3" object |
| ESC | Terminate the demo |
TESTSHAD

This is a testbed for my implementation of the Gouraud shading algorithm, which is good to have, because the calculations of the intensity values in the VECTOR demo are so mickey-moused that someone might conceivably doubt that I actually developed a real Gouraud shader. So, this testbed gives you the ability to test the functionality of the Gouraud shader to make sure it works.
An object with three differently colored faces is displayed. The three faces have one common vertex at the center, in which the intensity is set to maximum, while the other three peripheral vertices have intensities which you can vary individually to see the Gouraud shader at work. The coordinates of each vertex are picked at random, but if you do not like them you can hit SPACE to have the program select a different set of coordinates. At any given time you can see the intensity value of one of the peripheral vertices, and by pressing TAB you can cycle through all three of them. While the intensity value of a peripheral vertex is displayed, you can use the '+' and '-' keys on the numeric keypad to increase or decrease the intensity value at that vertex, so that you can watch the Gouraud shader at work.
If you think that the colors do not look very nice, remember that this is good old video mode 13, meaning that the maximum number of individual colors on the entire screen is 256, which makes color arithmetic quite hard. In this particular palette I have allocated 16 shades of red, 16 shades of green, and 16 shades of blue.
| Available controls: | |
|---|---|
| SPACE | select a different set of random vertex coordinates |
| TAB | cycle through the peripheral vertices |
| Numeric Keypad Plus ('+') | increase the intensity at the current vertex |
| Numeric Keypad Minus ('-') | decrease the intensity at the current vertex |
| ESC | terminate the demo |
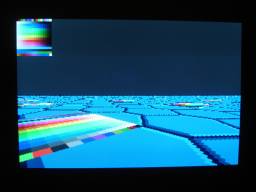
TEX
The novelty of the Gouraud-Shaded polygons of TIE Fighter did not last long; as the average home PC was becoming faster and faster, some pretty amazing games started showing up, including Quake I by Id Software and Descent by Parallax Software, both of them featuring fully three-dimensional, fully textured worlds for the first time on a PC. Back then, that did not look just advanced, it looked like magic. (Need I quote Arthur C. Clarke's 3rd Law?) Still not having learned my lesson, I tried to write a texturing routine for arbitrarily oriented polygons all by myself without first looking at any previous research whatsoever, and I failed miserably. Then I set my goal to something more reasonable, that is, texturing of surfaces that are either horizontally or vertically oriented. That one worked, and the result can be seen in this demo.
You are hovering above an endless surface covered with a hexagonal tile. You can move forward and backward, you can increase or decrease your altitude above the surface, and you can turn to your left or to your right. That's all.
Unfortunately, the keyboard sensing logic of this demo is so simplistic that it is dependent on the typematic autorepeat of the system on which it runs, so navigation is a little bit cumbersome. My apologies for this.
| Available controls: | |
|---|---|
| Left Arrow | Turn Left |
| Right Arrow | Turn Right |
| Up Arrow | Move Forward |
| Down Arrow | Move Backwards |
| Page Up | Increase Altitude |
| Page Down | Decrease Altitude |
| Numeric Keypad '5' | Reset Altitude |
| ESC | terminate the demo |
FLIGHT

In 1994 I went to a job interview with CyberDreams, during which the gentleman interviewing me allowed me to have a glimpse of the their upcoming CyberRace title. In this game you control a craft which hovers above a beautifully voxel-rendered terrain similar to that seen in Comanche, only better looking and faster. The terrain he chose for that demonstration was Olympus Mons on Mars, constructed from data they had obtained from NASA. Flying around the terrain was nice, but the mind-blowing part came when he flew over the opening of a deep crater and the craft took a slight dive into the void, immediately regaining altitude to clear the other side of the rim: the sensation was reminiscent of a similar dive of the Millennium Falcon in the asteroid chase scene on Star Wars I, with the same roller-coaster effect in the heart and in the stomach and in other areas of the body which need not be mentioned here. When I went back home after the interview I had this uncontrollable urge to do the same thing, and I just could not find rest unless I accomplished it.
This demo shows the result of my efforts. It is not nearly as good as Comanche or CyberRace, yet it does count as a crude proof of concept, and it is certainly improvable. Most importantly, it was made in a couple of days by a twenty-something year old "foreign student" working alone, having nothing to aid him other than the knowledge that it can be done after having seen it done.
Please note that this demo is made in Mode 13, not Mode X, so the raster lines are horizontal, not vertical, even though vertical raster lines would have helped a lot with the ray-tracing.
| Available controls: | |
|---|---|
| Numeric Keypad Left Arrow | Turn Left |
| Numeric Keypad Right Arrow | Turn Right |
| Numeric Keypad Up Arrow | Look Down |
| Numeric Keypad Down Arrow | Look Up |
| Numeric Keypad Page Down | Do not press this key! |
| Numeric Keypad End | Do not press this key! |
| Numeric Keypad '+' | Increase Speed |
| Numeric Keypad '-' | Decrease Speed |
| Numeric Keypad '5' | Level Camera |
| Cursor Keypad Left Arrow | Move North |
| Cursor Keypad Right Arrow | Move South |
| Cursor Keypad Up Arrow | Increase Altitude |
| Cursor Keypad Down Arrow | Decrease Altitude |
| ESC | terminate the demo |
Cover image: An actual photo of my computer monitor showing one of the demos